
Hi friends,
In last article, we saw what is histogram and how to plot it. This time we can learn a method for image contrast adjustment called "Histogram Equalization".
So what is it ? Consider an image whose pixel values are confined to some specific range of values only. For eg, brighter image will have all pixels confined to high values. But a good image will have pixels from all regions of the image. So you need to stretch this histogram to either ends (as given in below image, from wikipedia) and that is what Histogram Equalization does (in simple words). This normally improves the contrast of the image.
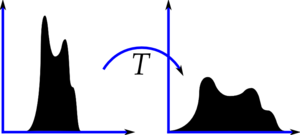 |
| Histogram Equalization |
Again, I would recommend you to read the wikipedia page on Histogram Equalization for more details about it. It has a very good explanation with worked out examples, so that you would understand almost everything after reading that. And make sure you have checked the small example given in "examples" section before going on to next paragraph.
So, assuming you have checked the wiki page, I will demonstrate a simple implementation of Histogram Equalization with Numpy. After that, I will present you OpenCV function. ( If you are not interested in implementation, you can skip this and go to the end of article)
Numpy Implementation
We start with plotting histogram and its cdf (cumulative distribution function) of the image in Wikipedia page. All the functions are known to us except np.cumsum(). It is used to find the cumulative sum (cdf) of a numpy array.
import cv2
import numpy as np
from matplotlib import pyplot as plt

img = cv2.imread('wiki.jpg',0)

hist,bins = np.histogram(img.flatten(),256,[0,256])

cdf = hist.cumsum()
cdf_normalized = cdf *hist.max()/ cdf.max() # this line not necessary.

plt.plot(cdf_normalized, color = 'b')
plt.hist(img.flatten(),256,[0,256], color = 'r')
plt.xlim([0,256])
plt.legend(('cdf','histogram'), loc = 'upper left')
plt.show()
 |
| Input Image and its histogram |
You can see histogram lies in brighter region. We need the full spectrum. For that, we need a transformation function which maps the input pixels in brighter region to output pixels in full region. That is what histogram equalization does.
Now we find the minimum histogram value (excluding 0) and apply the histogram equalization equation as given in wiki page. But I have used here, the masked array concept array from Numpy. For masked array, all operations are performed on non-masked elements. You can read more about it from Numpy docs on masked arrays
cdf_m = np.ma.masked_equal(cdf,0)
cdf_m = (cdf_m - cdf_m.min())*255/(cdf_m.max()-cdf_m.min())
cdf = np.ma.filled(cdf_m,0).astype('uint8')
Now we have the look-up table that gives us the information on what is the output pixel value for every input pixel value. So we just apply the transform.
img2 = cdf[img]
Now we calculate its histogram and cdf as before ( you do it) and result looks like below :
 |
| Histogram Equalized Image and its histogram |
You can see a better contrast in the new image, and it is clear from the histogram also. Also compare the cdfs of two images. First one has a steep slope, while second one is almost a straight line showing all pixels are equi-probable.
Another important feature is that, even if the image was a darker image (instead of a brighter one we used), after equalization we will get almost the same image as we got. As a result, this is used as a "reference tool" (I don't get a more suitable than this) to make all images with same light conditions. This is useful in many cases, for eg, in face recognition, before training the face data, the images of faces are histogram equalized to make them all with same light conditions. It provides better accuracy.
OpenCV Implementation
If you are bored of everything I have written above, just leave them. You need to remember only one function to do this, cv2.calcHist(). Its input is just grayscale image and output is our image.
Below is a simple code snippet showing its usage for same image we used :
img = cv2.imread('wiki.jpg',0)
equ = cv2.equalizeHist(img)
res = np.hstack((img,equ)) #stacking images side-by-side
cv2.imwrite('res.png',res)
See the result :
 |
| OpenCV Histogram Equalization |
So now you can take different images with different light conditions, equalize it and check the results.
Histogram equalization is good when histogram of the image is confined to a particular region. It won't work good in places where there is large intensity variations where histogram covers a large region, ie both bright and dark pixels are present. I would like to share to SOF questions with you. Please checkout the images in the questions, analyze their histograms, check resulting images after equalization :
How can I adjust contrast in OpenCV in C?
How do I equalize contrast & brightness of images using opencv?
So I would like to wind up this article here. In this article, we learned how to implement Histogram Equalization, how to use OpenCV for that etc. So take images, equalize it and have your own hack arounds.
See you next time !!!
Abid Rahman K.
No comments:
Post a Comment